
To install WordPress step by step, download the latest version from wordpress.org, unzip the file, and upload it to the public_html directory. Create a MySQL database and user, configure the wp-config.php file, and run the WordPress install.
Before installing WordPress, make sure to buy a domain name, purchase a web hosting plan, and download WordPress. To reinstall a fresh copy of WordPress, download the latest version, extract it, and upload it to your public_html folder using an FTP client.
Setting up WordPress from scratch involves getting web hosting and a domain name, installing a theme and plugins, configuring settings, creating pages and menus, and writing blog posts.

Credit: developer.wordpress.org
Introduction To WordPress Installation
WordPress is a versatile and user-friendly platform that powers millions of websites worldwide. Many individuals and businesses choose WordPress due to its flexibility, ease of use, and extensive customization options. Before starting the installation process, it’s essential to go through a pre-installation checklist to ensure a smooth setup. This checklist may include tasks such as purchasing a domain name, securing a web hosting plan, obtaining a code/text editor, and acquiring an FTP/sFTP client application for file management. Once these prerequisites are in place, users can proceed with the step-by-step installation process, which involves downloading the latest version of WordPress, creating a MySQL database and user, configuring the wp-config.php file, and running the WordPress installer. By following these steps, individuals can set up their WordPress website efficiently and begin utilizing its powerful features for their online presence.

Credit: wordpress.org
Choosing A Web Hosting Provider
When choosing a web hosting provider for your WordPress website, it’s important to consider the different types of hosting services available. Shared hosting is cost-effective and suitable for small websites, while VPS hosting provides more control and dedicated resources. For high-traffic or resource-intensive sites, dedicated hosting offers the highest level of performance and security. Recommended WordPress hosting providers such as Bluehost, SiteGround, and WP Engine offer specialized WordPress hosting with features optimized for the platform, including one-click installations and automatic updates. Evaluating the specific needs of your website will help you determine the most suitable hosting option for a seamless WordPress installation.
Registering A Domain Name
When it comes to registering a domain name for your WordPress website, there are a few tips you should keep in mind:
- Keep it simple and easy to remember.
- Avoid using numbers and hyphens.
- Make it relevant to your website’s content or niche.
- Consider using keywords that are related to your business.
- Check for trademark infringement before finalizing your domain name.
- Choose a domain extension that fits your target audience (e.g., .com, .org, .net).
By following these tips, you can ensure that your domain name is memorable, relevant, and optimized for search engines. Registering your domain is an important step in the process of installing WordPress and launching your website.
Setting Up WordPress Locally
Learn how to set up WordPress locally with this step-by-step guide. Download the latest version of WordPress, create a MySQL database and user, configure the wp-config. php file, and run the WordPress install. It’s a simple process to get your WordPress site up and running on your local machine.
Installing Wamp Or Xampp
To install WordPress locally, you need to set up a local server environment. Two popular options are WAMP and XAMPP. These tools create a local server on your computer, allowing you to run WordPress offline. Once you have installed either WAMP or XAMPP, you can proceed with creating a database for WordPress.
Creating A Database For WordPress
After setting up the local server, you need to create a database for WordPress. This can be done through the server’s control panel. The database is where all your WordPress data will be stored, including posts, pages, and settings. Make sure to choose a unique name for your database and keep the details handy for the WordPress installation process.
Installing WordPress On A Web Host
To install WordPress on a web host, first, register for a hosting plan and domain name. Then, configure the hosting, create a database, and upload the WordPress files. After that, configure the wp-config. php file and run the WordPress install to complete the process.
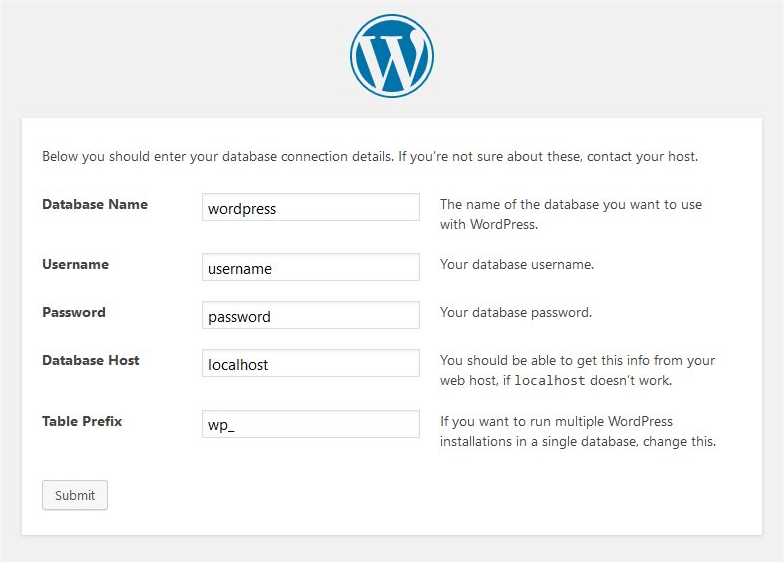
To install WordPress, you have two options: one-click installation or manual installation. One-click installation is the easiest and fastest way to install WordPress on a web host. On the other hand, manual installation requires more technical knowledge, as you need to download the latest version of WordPress from wordpress.org, create a MySQL database and user, configure the wp-config.php file, and run the WordPress install. Once you have installed WordPress, you can configure the wp-config.php file to customize your website. You can add your database name, username, password, and host to the file. It’s important to secure your website by creating a strong password and keeping your plugins and themes up to date. Overall, installing WordPress is a straightforward process that requires some technical knowledge, but it can be done by anyone with a little bit of patience and perseverance.Selecting A WordPress Theme
After selecting WordPress as your content management system, the next step is to choose a theme. WordPress offers thousands of free and premium themes to choose from. You can find themes from the WordPress repository, third-party theme marketplaces, or from the theme section of your WordPress dashboard.
Once you have selected your theme, the installation process is simple. If you are installing a free theme from the WordPress repository, you can directly install it from your WordPress dashboard. If you have a premium theme, you will need to upload it manually. To do this, go to Appearance > Themes > Add New > Upload Theme. After uploading, click Install and then Activate.
| Source | Time | Topics Covered |
|---|---|---|
| Bluehost YouTube | 4:18 | Install WordPress Locally, through Web Hosting Provider, Choose a name for website, Log into WordPress, WordPress Dashboard |
| Let’s Build WordPress YouTube | 4:56 | Register Hosting & Domain Name, Get Hosting, Choose Hosting Plan, Pay for Your Hosting, Configure Hosting, Enter Username and Password, Install WordPress, WordPress Dashboard |
| LearnWebCode YouTube | 11:37 | Three primary options for installing WordPress, Signing up for Web Hosting, Choosing a Web Host, Installing WAMP or XAMPP, Download WordPress, Extracting WordPress, Creating a WordPress Configuration File, Configuring the WordPress database |
| Devtamin YouTube | 5:37 | Create a Database for WordPress, Installation Page, The Site Title |
WordPress Plugins
WordPress plugins are essential tools that can help extend the functionality of your website. To install WordPress step by step, you will need to first register for web hosting and a domain name, download WordPress, create a MySQL database, configure the wp-config.
php file, and finally run the WordPress installer. It’s a fairly straightforward process, and there are many resources available to guide you through each step.
When it comes to installing plugins on WordPress, there are a few must-have plugins that beginners should consider. These plugins enhance the functionality and performance of your website, making it easier for you to manage and customize your content.
- Yoast SEO: This plugin helps optimize your website for search engines, improving your chances of ranking higher in search results.
- WooCommerce: If you plan on selling products or services on your website, WooCommerce is a powerful plugin that enables you to set up an online store with ease.
- Contact Form 7: This plugin allows you to create and manage multiple contact forms on your website, making it convenient for visitors to get in touch with you.
- Jetpack: Jetpack offers a suite of features including site security, performance optimization, and social media integration, helping you enhance the overall functionality and user experience of your website.
Installing plugins on WordPress is a straightforward process. Simply navigate to the “Plugins” section in your WordPress dashboard, click on “Add New,” search for the desired plugin, and click “Install” followed by “Activate.” Make sure to regularly update your plugins to ensure compatibility and security.
Final Steps
Installing WordPress step by step is a crucial process for creating a website. Follow the guidelines provided by experts to avoid common mistakes and ensure a successful installation. From registering hosting and domain names to configuring the WordPress dashboard, this comprehensive tutorial covers everything you need to know.
Final Steps Setting Up Your WordPress Website Once you have successfully installed WordPress, there are a few final steps you need to take to set up your website. First, choose a name for your WordPress website. This will be the domain name that visitors will use to access your site. Next, you need to log into WordPress. Use the username and password you created during the installation process to access your WordPress dashboard. From the dashboard, you can customize your website’s appearance, install themes and plugins, and create new pages and blog posts. Creating Your First Blog Post To create your first blog post, navigate to the “Posts” section in the WordPress dashboard. Click on “Add New” to start writing your post. Give your blog post a title and start writing your content in the text editor. You can use the formatting options to add headings, bold or italicize text, and insert images or links. Once you are satisfied with your blog post, click on the “Publish” button to make it live on your website. Congratulations! You have successfully set up your WordPress website and created your first blog post. Now you can start sharing your ideas and engaging with your audience.Maintaining Your WordPress Site
When it comes to maintaining your WordPress site, it’s crucial to perform regular updates. This includes updating the WordPress core, themes, and plugins to ensure optimal performance and security. Additionally, it’s essential to set up regular backups to protect your site’s data in case of any unforeseen issues. Furthermore, prioritizing security measures such as using strong passwords, implementing SSL certificates, and utilizing security plugins can help safeguard your WordPress site from potential threats.

Credit: www.tutorialspoint.com
Frequently Asked Questions
How To Install WordPress For Dummies?
To install WordPress for dummies, follow these steps: 1. Download the latest version of WordPress from wordpress. org. 2. Unzip the file and upload it to the public_html directory. 3. Create a MySQL database and user. 4. Configure the wp-config. php file.
5. Run the WordPress installation. Make sure to buy a domain name, purchase a web hosting plan, and download WordPress before starting the installation process.
What To Do Before Installing WordPress?
Before installing WordPress, you should buy a domain name and purchase a web hosting plan to gain access to a web server. Additionally, you need to get a code/text editor and an FTP/sFTP client application to edit files on your web server.
Finally, download the latest version of WordPress.
How Do I Freshly Install WordPress?
To freshly install WordPress, follow these steps: 1. Download the latest version from wordpress. org. 2. Unzip the file and upload it to the public_html directory. 3. Create a MySQL database and user. 4. Configure the wp-config. php file. 5.
Run the WordPress install.
How To Setup WordPress From Scratch?
To set up WordPress from scratch, follow these steps: 1. Get web hosting and a domain name. 2. Find and install a WordPress theme. 3. Install plugins. 4. Import demo content (optional). 5. Configure WordPress settings. 6. Create pages. 7.
Set up your menu. 8. Write your first blog post (optional).
Conclusion
Congratulations! You have successfully learned how to install WordPress step by step. With the knowledge gained from this blog post, you can now confidently create your own website with ease. Remember to always keep your WordPress installation up to date and secure by regularly backing up your site and installing security plugins.
With WordPress, the possibilities are endless for creating a stunning website that reflects your unique brand. Happy website building!